

Google Cloud Functions is a serverless computer product, which allows you to write functions that get triggered when an event attached to it is fired. Since it’s a serverless service, we don’t have to worry about setting up or managing servers or any infrastructure. This kind of product is also known as functions as a service (FaaS).

It’s cost effective as it only runs when the event attached to it is triggered, and terminates after the execution of the function. Furthermore, the resources scale automatically in response to the frequency of events. Therefore without having to do any further work, it can scale to handle events accordingly, from a few invocations to millions of invocations a day.
In our case, we are going to use this serverless solution offering from GCP, to serve our machine learning model predictions in response to HTTP request events.
Simply put, we will deploy our model as a function, which responds to model prediction requests via HTTP endpoint.
This article assumes you already have a GCP account. If you don’t have one, signup here which comes with some free credits.
If you want to interact with your GCP account from your local machine, install the Google Cloud SDK using the steps outlined here.
All the code in this article was developed in Python 3.8. The codes and necessary files for this article can be found in the GitHub repository here.
Before we continue, let us take a look at the architecture of the solution for serverless machine learning prediction HTTP endpoint.
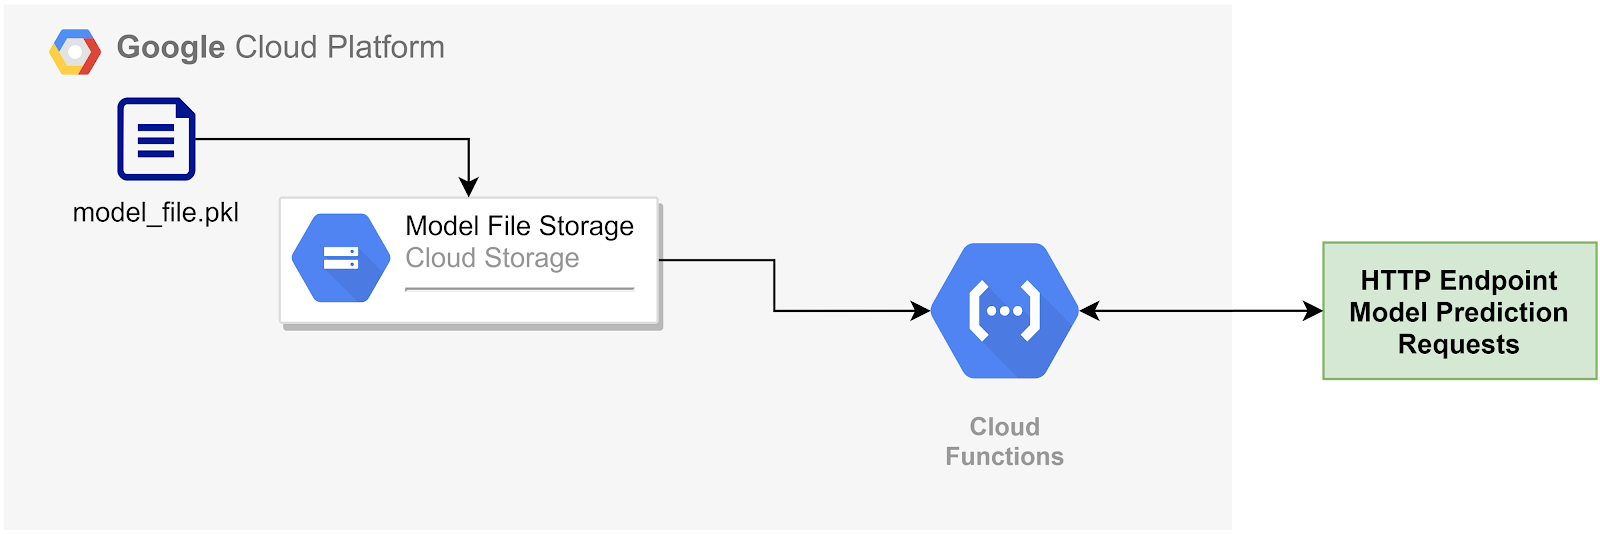
Serverless Machine Learning Model HTTP Endpoint using Google Cloud Functions
In this architecture, the machine learning model file is stored in a Google Cloud Storage bucket. Our cloud function does the following, in response to an HTTP request for model prediction :
Ok! Without any further ado, let’s get started!
To proceed, we first need a machine learning model. If you already have a model for your problem saved, you can skip to the next step.

For the purposes of this article, I have generated a machine learning model for the famous iris flowers dataset classification problem (available here). This problem uses four columns of measurements (sepal length, sepal width, petal length, petal width) of the flowers in centimetres to predict the flower species.
To learn more about this problem in a tutorial fashion, I recommend the following site here.

Search for Storage on Google Cloud Platform Console
In the GCP console, search for storage to find cloud storage and click create a bucket. Give the bucket an appropriate name and make sure to create the bucket in the same region as where you plan to run the cloud function. You can leave the rest of the settings as is and hit create.

Creating Cloud Storage Bucket to Store Model
When the bucket is created, you can upload the model file into the bucket by drag/drop or using the upload button.
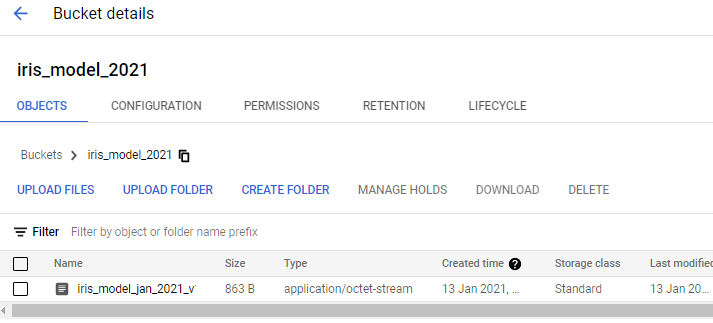
ML Model Uploaded to Google Storage Bucket
You can also use the command line/terminal to create the bucket and upload the model, if you have installed the Cloud SDK. Refer to the commands here to interact with your cloud storage from the command line.
Now search for cloud functions on the GCP console and click on create function. Give the cloud function an appropriate name and make sure it’s in the same region as the model storage bucket. Select the function trigger type to be HTTP.
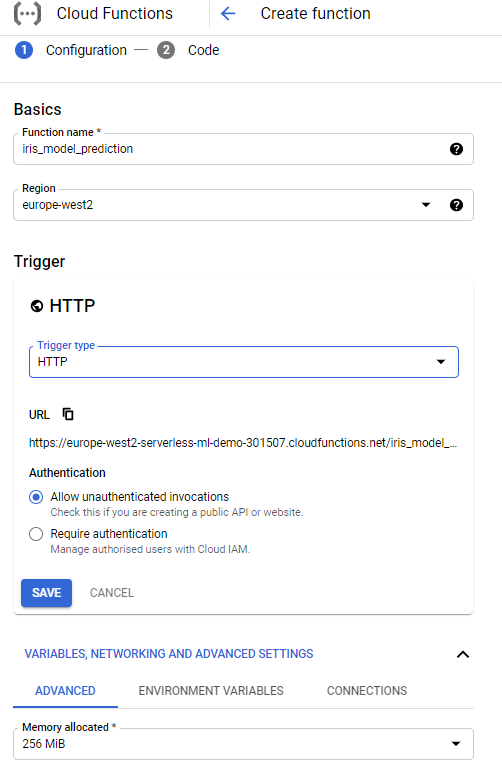
Create Cloud Function To Serve Model Prediction
For simplicity of the article, set authentication to allow unauthenticated invocations. In a real world solution, it must be set to require authentication, which will allow you to control access to this function using Cloud IAM.
The rest of the variables can be left as is. Our function is very simple and the model file is small. Therefore, an execution environment with 256 MiB is more than enough for our purposes.
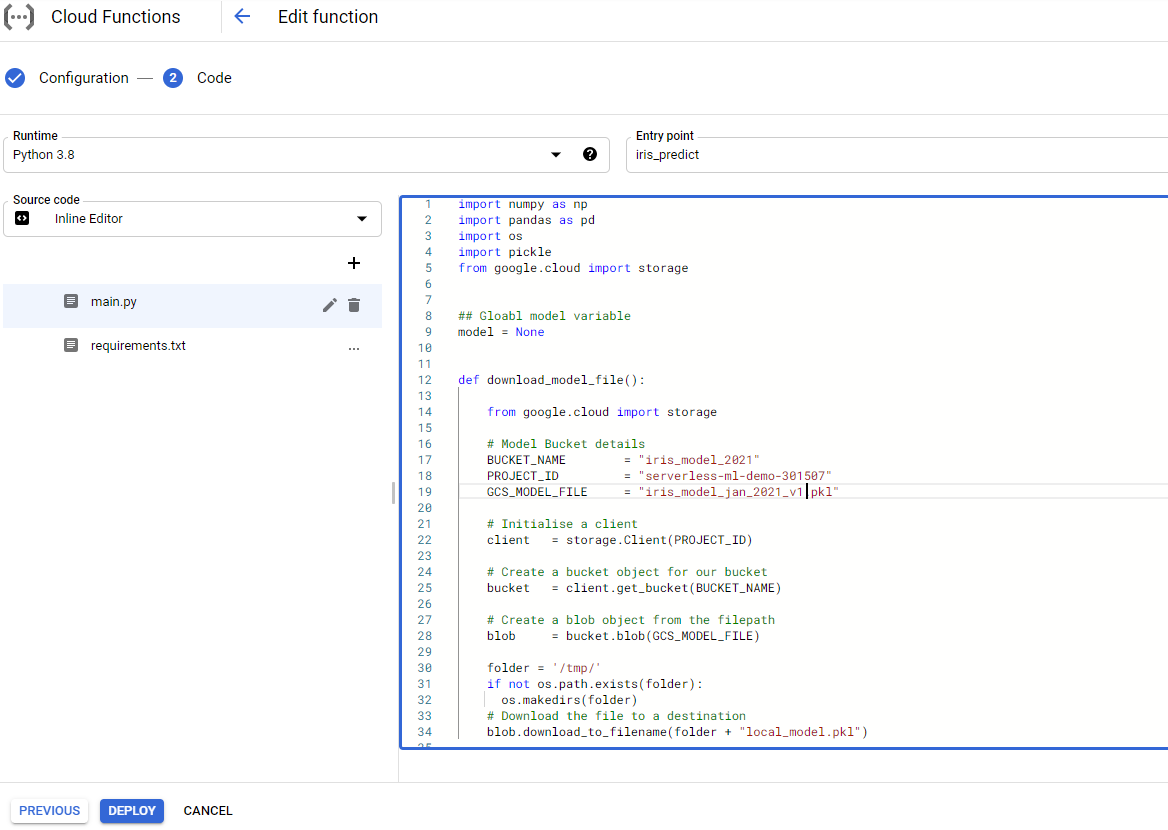
Once you click next from the previous setup, you will be able to see the inline source code editor window. This is where we define our runtime environment and code the function to execute. Select the Runtime environment as python 3.8, as we will be coding in python.
Coding the Model Prediction Cloud Function
Notice that there are 2 files displayed below the Source Code Inline Editor:
You can copy & paste the contents of these 2 files from the repository here or the gist below.
Gist of the Google Cloud Function Files for Serverless Model Prediction HTTP Endpoint
There are 2 functions in the main.py file:
The download_model_file function retrieves the model from the specified cloud storage bucket to the cloud function environment. Note that in the cloud function environment, we can only write to the /tmp directory. Hence, the model is downloaded and saved in this directory.
The iris_predict function is the main entry point function which responds to the HTTP request. It calls the download model function if the model is not available in the memory and run’s the prediction if a featured JSON input is sent by the HTTP request. Make sure to update the entry point input box as iris_predict.
Notice how the model global variable is used to cache the model in memory. During the first function invocation, the model file will be retrieved from GCS and loaded via pickle. Due to this, the response time on the following invocations will be faster as the model is already in memory.

Cloud Function is Deployed and Active
Once the source files are updated, initiate the deployment process, which will install the libraries from the requirements files and setup the cloud function. This can take some time and you will see a loading circle next to the function name.
Once the setup is complete and the function is deployed successfully, a green tick mark will appear next to the function name.
You can now test your function by clicking on the function name and selecting the testing tab. In this tab, you can trigger the cloud function by sending JSON features inputs like so {“features”:[2,3,4,5]}.
The function will respond with the model prediction, which will appear in the output section. You can also get the model trigger URL from the trigger tab, which can be used by other services.

Serverless Machine Learning Model Prediction of Iris Model
Note that there is no code in the cloud function to perform a sanity check of the JSON being sent. Therefore, the current function will generate an error if the JSON is invalid or the values of the features key are not in the expected format.
Currently, the only checks we do in the function is to respond with a message if the features key is not present in the JSON request.

Cloud Function Response when the JSON Request is Missing features Key
In a real world application, it’s important to have checks in place to validate the JSON and its contents. For the purpose of simplifying this article, they have been avoided.
Congratulations !! You now know how to deploy your model as a serverless function on GCP. 😄